Decomposition starts right after the death of your trophy. The more time bacterium are given to break down the skin cells of your specimen, the less structure there will be left to hold in the base of your trophies hair, fur, scales, or feathers. So the sooner you take care of your acquired trophy, the better the quality of the finished product.
Never drag or hang with a rope around the neck
Never slit the throat to bleed
Rinse off blood around face or wound and blot dry. Leaving blood on the skin will increase decompostion time
Clean off any dirt, leaves, gravel, etc. from specimen
Place in a plastic bag and tie shut
Keep in a cooler or refrigerator, but only if you can deliver it to a taxidermist within 1 to 3 days
If it can't be delivered to a taxidermist within 3 days, tie shut within 1 or 2 plastic bags and keep in a freezer set at 0 degrees or lower
Fish
A camera is a good tool to have when fishing, for both replicas,( to be made for catch & release), and for an accurate reference for skin mounts. Fish lose color fast and lose all color after mounted, before painting is completed.
Measure longest length with fish laying straight, and measure around the fish at its largest girth for catch and release fish.
Never belly cut and gut fish. It will only cost extra to repair and still won't look as good as originally.
Place wet in 1 or 2 tied shut plastic bags. (It is optional to first wrap in an old completely saturated towel.)
Keep in cooler, refrigerator or freezer depending on how soon it can be
delivered to a taxidermist.
Game Heads
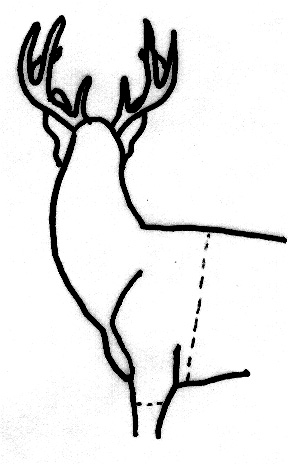
Refer to the top of this page for basic trophy care. When sknning for a shoulder mount, it's better to cut to long than too short. With the animal laying on its side, poke your knife into the side skin, blade edge up, starting behind the trailing edge of the front leg. Then imagine a straight line going up to the animals back. Slowly cut up heading to the spine. It is better to angle slightly back towards the tail, then towards the head. After you have made your incision up one side, roll the specimen over to its otherside. Now continue your cut from where you stopped your last cut at the spine, and cut down to behind the trailing edge of the other front leg. Continue this incision across the belly to where the cut started, behind the other leg. From the circumference incision that you've already made around the body, make a perpendicular cut over to, and then down a couple of inches, of both trailing edges of the front legs. Now make a perpendicular cut from the bottom of the trailing edge leg cuts, all the way around the upper leg to separate the upper leg skin from the rest of the leg. With one hand holding the edge of the skin and the other hand cutting, carefully work the knife between the skin and muscle. Keep working all the way around, working towards the head, rolling the skin back like you were inverting a sock. When you have worked the skin like this all the way to the back of the head, you can stop. (Unless you already have experience, let the taxidermist skin out the head. If you do skin out the head, make sure you take measurements first.
Nose to front of eye
Nose to back of skull
Neck circumference 2" behind head
If the animal has either horns or antlers, measure from the nose to the left and right of each of the sides closest points
For the taxidermist to have enough neck left to measure to acquire a proper fit, use a saw starting approximately 3" back from the head to cut through the neck and separate. Now make sure the cape is clean of debris and blood on the face, ears, or hair, is rinsed off. Then place in a plastic bag and tie shut. Either REFRIGERATE OR FREEZE depending on how soon you can deliver it to a taxidermist.
NOTE- [If you received your hide skinned from a meat processor with the skin slit down the belly and intact, still separate the cape from the rest of the hide by the directions above.]
Full Mounts
Animals, coyote size and smaller, should be brought in whole. Do not belly cut. Clean the specimen off, place a little paper towel in any area where blood is seeping, such as a wound, mouth, nose, etc. to absorb blood and keep it out of the hair or fur. Then place in a plastic bag, tie shut and freeze at 0 degrees or below. If you have experience skinning you can skin the small game the same as the directions for the large game below.
First thing is to take good measurements. If the head area will be skinned as well:
Measure from the nose to front corner of eye
Nose to back of skull, neck circumference a couple of inches behind the head
If it has horns or antlers, measure from the nose to the closest point on the left and right side
It also helps to measure from the back corner of the eye, to the base of the horns or antlers. Whether your skinning the head or not, the rest of the measurements must be taken.
Measure down the top side following the contours of the body from the tip of the nose to the base of the tail
Measure for the animals girth all the way around the largest part of its rib cage.
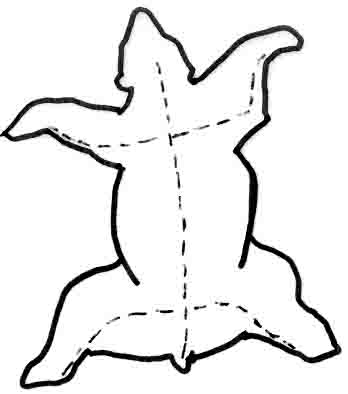
We prefer in most cases on lifesize mounts to have them skinned with a dosal cut (Down the back). This is because it's normally easier to sew up and covers up well with the longer hair down the back. This isn't always true, and has to be determined on a case by case basis, depending on the animal, how its hair is, and how it will be positioned for the finished mount (If your specimen would best be belly cut, then follow the directions for skinning a rug).
With a dorsal cut, start your knife at the spine at the back of the head between the ears or slightly below. Slowly work your knife down heading towards the tail, keeping it centered above the spine. Stop your incision just short of the tail. It also helps to make an incision on the trailing edge of each leg, starting behind the knee and running it down to the the heel of each foot. Now go back to the dorsal and saw or snip through the bone at the base of the tail to separate it from the body. Carefully starting at the dorsal cut, work your hands and knife between the skin and muscle to separate. Keep working skin around both sides until you get to the belly. (Note- it helps if you are able to hang the animal up by the rear end and let gravity help you skin.) After you have separated the skin all the way around the body at the belly, then start working down one of the rear legs. As you work down the leg you'll see where the incisions you made earlier down the trailing edge help. If you know how to skin out the feet, then carefully skin out to the last joint of each toe. If not, saw through the leg before each foot and let the taxidermist complete it. After you have completed this, then do the same to the other rear leg, and then each of the front legs in the same manner. After you have completed the legs, continue working the skin around the neck, heading towards the head continue carefully. Only skin the head if you have experience, and have taken measurements. If not saw through the neck and separate 3 inches back from the start of the head. Now make an incision on the bottom side of the tail at the base. Then work slowly keeping it centered working to the tip. Carefully work around the bone and remove. Now take the skin, clean off loose debris or blood and bag and refrigerate or freeze immediately.
Rugs
1st measure from nose to the front corner of the eye
From the nose to the back of the skull
The neck 2 inches back from the head
The nose to the base of the tail following the contours of the back
The circumference of the chest at the largest point.
Lay the animal on its back and start you incision on the under side of the animal at the upper throat for a rug, or between the front legs if your belly cutting for a full mount. Run this incision all the way down the underside. Cut through the vent and continue down the center of the tail until just before the end. Make incisions from this centered belly cut, over to and down the center of the inside of each leg, and then over to and down the trailing edge of each leg to the base of the foot. Now separate the skin from the muscle by working from the incisions on the body and legs all the way around the body. (Only skin out the feet and head if you have experience. Otherwise cut through the leg bone before each foot, and the neck 3 inches back from the head.) Let the taxidermist do the rest. After the skin has been removed, clean, bag and freeze accordingly.
Birds
Clean off any loose debris, and lightly rinse and blot dry any blood on the feathers. Plug the mouth, nostrils, and any wound with pieces of paper towel, to keep any seepage from staining the feathers. (It is optional to slide the bird into an old pair of nylon stockings, head first, to protect and hold the feathers down and in place. If you don't have stockings, you could wrap an old towel around side-ways, or some paper towels. Do this with wings folded to its sides and head laying against the body.) Now carefully place this in one or two layers of plastic bag, tie shut, and freeze immediately.